Migration of NativeScript Cloud Builds to Circle CI
In recent months we have re-evaluated our cloud build offering and the user demand for it. The results show there are a lot of missing features and people often struggle in scenarios where they need control of the environment or when an issue in a cloud operation occurs. Each of the cases are unique, but due to the architecture of the NativeScript cloud builds, we are not able to provide the experience our customers deserve.
We have researched different options for filling the gap between customers' requirements and our current architecture. We came to the conclusion that we need an entirely new solution. We have worked hard to provide it and we have already introduced it - cloud builds with Circle CI. You can read more about the solution in this great blog post from Dimitar Tachev.
The new solution provides much better experience in the terms of:
- Control of the environment
- CI integration (the new solution allows easy setup of CI for each of your PRs, which was almost impossible with existing cloud builds)
- Resolving issues and debugging them in the cloud
- Extensibilty of the cloud providers - the plugin can be tuned to use different cloud providers or even a local machine
IMPORTANT: As we do not see any benefit in keeping the existing cloud build solution when we have a much better one, we have decided to discontinue the existing NativeScript cloud builds. The stoppage will be effective on May 31st 2020 for all cloud builds.
What does it mean for you and your applications
Existing NativeScript cloud builds will be stopped effectively on May 31st 2020.
We encourage all of you to migrate to the new solution before this date!
How to migrate
Below we will try to provide a detailed description of how to migrate your existing application to be build with the nativescript-remote-builds plugin instead of NativeScript cloud builds.
System requirements
Before starting, please ensure you have installed all of the components listed below and they are accessible in your command line:
- OpenSSL - try
opensslin your command line - Ruby - execute
ruby -vin your command line to ensure it is accessible - Git - execute
git --versionin your command line to ensure it is accessible - Fastlane - after you've installed Ruby, just execute
gem install fastlane(you need version 2.144 or newer)
Preparing code signing for iOS
In case you want to build for Android, just go to Migrating the application
The setup of the current NativeScript cloud builds requires you to have a valid paid Apple developer account and a generated pair of certificate and provisioning profile.
The nativescript-remote-builds plugin works with fastlane behind the scenes and relies on the fastlane match approach for iOS code signing. In this approach fastlane manages your certificates and provisioning profiles and stores them in the private GitHub repository you've provided for this action.
Generating the fastlane match repository
- First of all, you'll need Ruby installed on your machine. You can get it here.
- After that, you need fastlane, just execute
gem install fastlane - At this point you have two options: 3.1 In case you have macOS, we strongly recommend using the command
fastlane match- the command will prompt you for the private repository to store the autogenerated certificates and provisions, your Apple identifier, and password. 3.2 In case you do not have macOS, you'll have to manually import the required certificates and provisions for building your applications. In this case use thefastlane match importcommand.
The two approaches are described below:
NOTE: When fastlane asks you for private match repository, ensure you are using
ssh, nothttps
Migration with automatic codesigning (recommended way)
In this scenario you should not think about your current certificates and provisioning profiles. Just execute this on macOS:
fastlane match
The command will prompt you for your Apple credentials, the private repository for storing the certificates, and the password to protect the files. After you've entered all of the information, fastlane will automatically import all of the required certificates based on your Apple account and will use them from there during build.
NOTE: You will need macOS only the first time when you execute
fastlane match. After that you will be able to build for iOS from Windows, Linux, and macOS.
Migration with manual codesigning (not the recommended way)
In case you do not want to use the automatic managing of provisions and certificates, you can import the certificate and the provisioning profile manually in the match repository. To achieve this you need the .mobileprovision, .p12, and .cer files used for building your application.
Detailed step by step guide
In case you do not have a valid
.p12and.mobileprovision, you can generate one by using NativeScript Sidekick and the Apple Developer portal. 1) First you need to generate the certificate, please follow steps in this article. 2) After that you need to generate a mobile provision - just follow the Apple guidelines.
1) Getting the matching .cer file for your .p12:
In order to use the same pair of certificate and provision that you've used for existing NativeScript Cloud builds for CircleCI builds, you'll need the .cer file as well. You can get it by following these steps:
- Open Apple's developer portal
-
Login with your account by clicking on the account menu at the top right corner
- (Optional) In case you are part of multiple Apple development teams, ensure you've selected the one from which you want to export the certificate, in the top-right corner of the page.
- In the newly opened window click on the Certificates, IDs & Profiles menu
- In the new window, ensure Certificates is selected on the right. On the left side you'll find list with all of your certificates. Find the one you want to export and click on it.
- On the right side of the new window you'll find download button. Click on it and you will get the
.cerfile.
In case you are not sure what is the Certificate in the Apple Developer portal that matches your local .p12 file, you can use the following command to get the friendly name:
openssl pkcs12 -info -in <path to your .p12 certificate>
The command will prompt you for password, you can just press Enter in case your certificate is not password protected.
A sample output is:
openssl pkcs12 -info -in ios_development.p12
Enter Import Password:
MAC: sha1, Iteration 1
MAC length: 20, salt length: 8
PKCS7 Encrypted data: pbeWithSHA1And40BitRC2-CBC, Iteration 2048
Certificate bag
Bag Attributes
    friendlyName: iPhone Developer: John Doe (F34A23801A)
    localKeyID: ...
subject=UID = KHMY4SS8C9, CN = iPhone Developer: John Doe (F34A23801A), OU = A49FBB0MS7, O = Company Name, C = US

issuer=C = US, O = Apple Inc., OU = Apple Worldwide Developer Relations, CN = Apple Worldwide Developer Relations Certification Authority

-----BEGIN CERTIFICATE-----
...
Note the friendlyName in the output - the first part iPhone Developer shows the type of the certificate, in this case iOS Development, and the second one is the Certificate name (John Doe) in this case.
In the Apple Developer Portal you can search for Certificate named John Doe with type iOS Development. In case there's more than one certificate that matches the mentioned criteria, you can try to find out which is yours by getting the expiration date. To do this, just execute the following command:
openssl pkcs12 -in <path to your .p12 certificate> -nodes | openssl x509 -noout -enddate
This will print the expiration date of your local certificate, so you can check it in the Apple Developer Portal.
After you have all the .cer, .p12 and .mobileprovision files you can proceed with next steps.
2) Removing the password from the .p12 file.
fastlane match cannot work in case your .p12 private key is protected with password, so you need to remove it. To achieve this, do the following:
- Download the latest version of RemoveP12Password from here
- Run it by passing the path to your local
.p12file, the password with which it is protected and the output file, which will be password free:
RemoveP12Password /Users/vladimirov/my-certificate.p12 123456 /Users/vladimirov/my-certificate-no-pass.p12
3) Import the password free certificate, .cer and .mobileprovision in your match repository:
fastlane match import
...and the command will ask you for the .cer, .p12 and .mobileprovision files
PLEASE NOTE: The
fastlane match importdoes not work very well with wildcard application identifiers set in the provisioning profile, so you'll have to use a specific app id for each of the mobile provisions you import. There's an issue infastlane match importcommand on Windows, which requires to have atmpdir at the root of the drive where fastlane is installed. Please create one, for exampleC:\tmp. When usingfastlane match importon Windows and there are prompts, ensure to drag drop the files in the terminal as the input may be broken by spaces or quotes symbols.
Migrating the application
In order to migrate the application, you have to set up the nativescript-remote-builds plugin in your app. Here are the basic steps you need to take, more detailed description and all of the supported scenarios can be found in the plugins README.md:
1) Create your account in Circle CI or log in with your existing account.
2) Generate a personal access token for your Circle CI account and copy its value.
3) In your application install the nativescript-remote-builds plugin: npm install --save nativescript-remote-builds
4) Create .nsremote.config.json file at the root of your application.
5) Add the sshRepositoryUrl property in the .nsremote.config.json - the repository is the one associated with your application and enabled for builds in CircleCI:
{
    "circleci": {
        "sshRepositoryURL": "{{an SSH GitHub repository url}}"
    }
}
6) Ensure you have a valid ssh key without password on your local machine and associated with your GitHub account. You can follow steps here
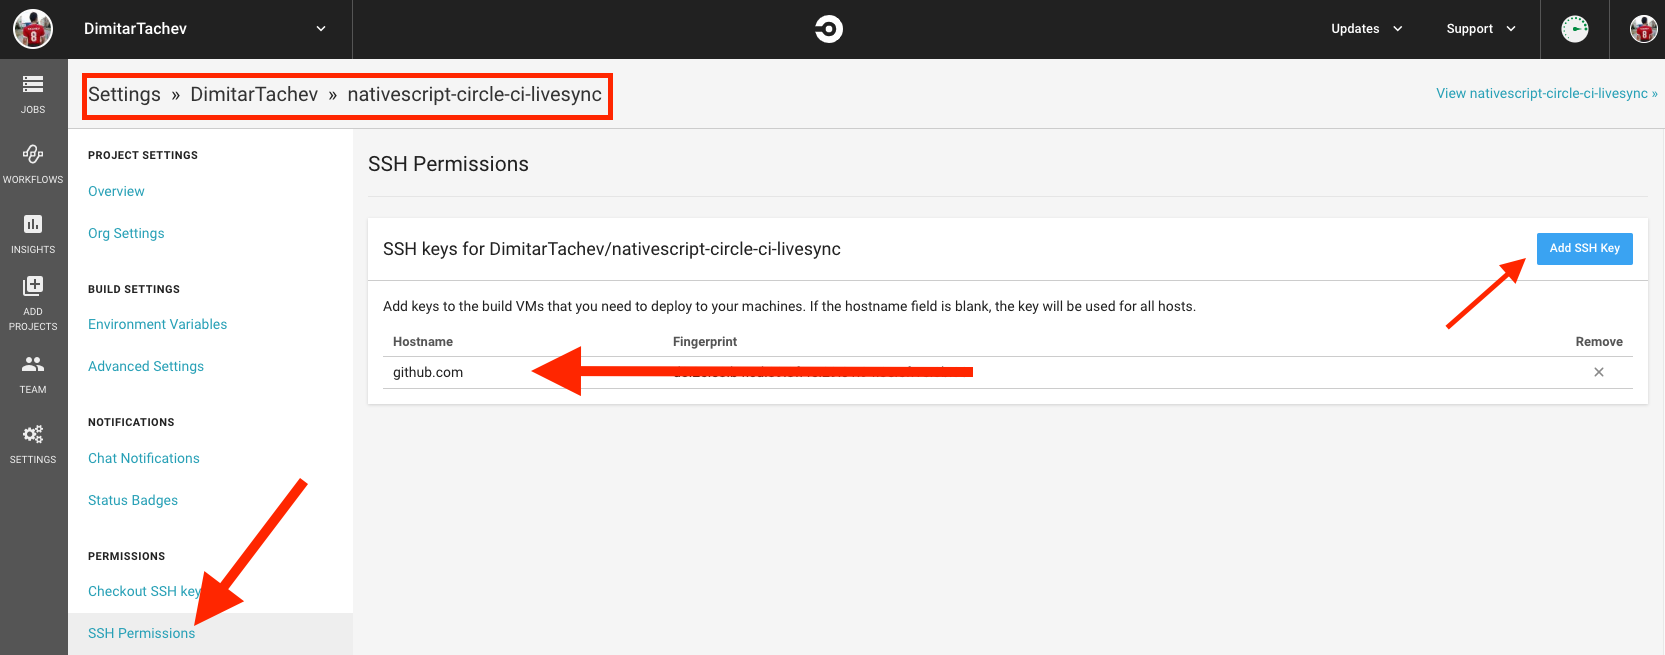
7) Add your ssh key to your Circle CI account as shown in the following image.
NOTE: When setting the ssh key in Circle CI, you have to fill in hostname, ensure it is github.com
8) Create .nsremote.env.json file at the root of your application.
9) Add the Circle CI access token value in the .nsremote.env.json configuration file:
{
    "local": {
        "CIRCLE_CI_API_ACCESS_TOKEN": "{{your Circle CI access token generated in step 2}}"
    }
}
10) (required for iOS Builds) Add IOS_SIGNING_REPO_URL, IOS_APPLE_ID and MATCH_PASSWORD to the .nsremote.env.json file:
{
    "local": {
        "CIRCLE_CI_API_ACCESS_TOKEN": "{{your Circle CI access token generated in step 2}}"
    },
    "remote": {
        "IOS_SIGNING_REPO_URL": "{{ssh url to the repository containing your certificates (the fastlane match repository)}}",
        "IOS_APPLE_ID": "{{the email with which you login in the Apple developer portal}}",
        "MATCH_PASSWORD": "{{the password for your fastlane match repository}}"
    }
}
11) Build in the cloud with Circle CI by using:
tns build ios|android
You can even run it directly if you have connected devices:
tns run
Or even debug on specific device/emulator:
tns debug ios|android
Whenever NativeScript CLI needs to build the application, it will do it in the Circle CI. During the build you will see message from the CLI:
A cloud build has started. Open <url> for more details.
You can check the URL in Circle CI for details of the execution.
Summary
The new solution for NativeScript cloud builds is much more flexible and powerful. We encourage you to give it a try and get the most out of it!