The Writing and Rewriting of EloCute: A NativeScript-Vue Story
For some people, learning a new framework involves painstaking combing through books, Udemy videos, and step-by-step building of a todo app, walking through each change methodically. Me, I’m one of those weirdos who likes to learn by building an app that I intend to move to production ASAP. While I did get through Udemy courses and read a fair number of getting-started blogposts, as well as reading through the Vue.js docs, I decided early on that I was going to really jump into Vue.js by building an app that I always dreamed of building: an app for teachers and students of second languages, to help digitize the painful task of testing spoken skills such as clarity of speech and accent perfection in a second language.
As a former French language and literature teacher, and as a student of several second languages, I always found it extremely painful to sit in one of those antique language labs with klunky headphones and equipment from the 1980s (or earlier!) and speak into a microphone to practice spoken skills. Some programs, unable to access this expensive hardware, simply seem to neglect the practicing of spoken skills - Chinese language schools, for example, often utterly fail to meet the needs of a new language learner’s desire to gain spoken proficiency. The lack of immediate feedback and the isolated experience seem to cry out for a mobilized solution to the language lab.
Meet Elocute!
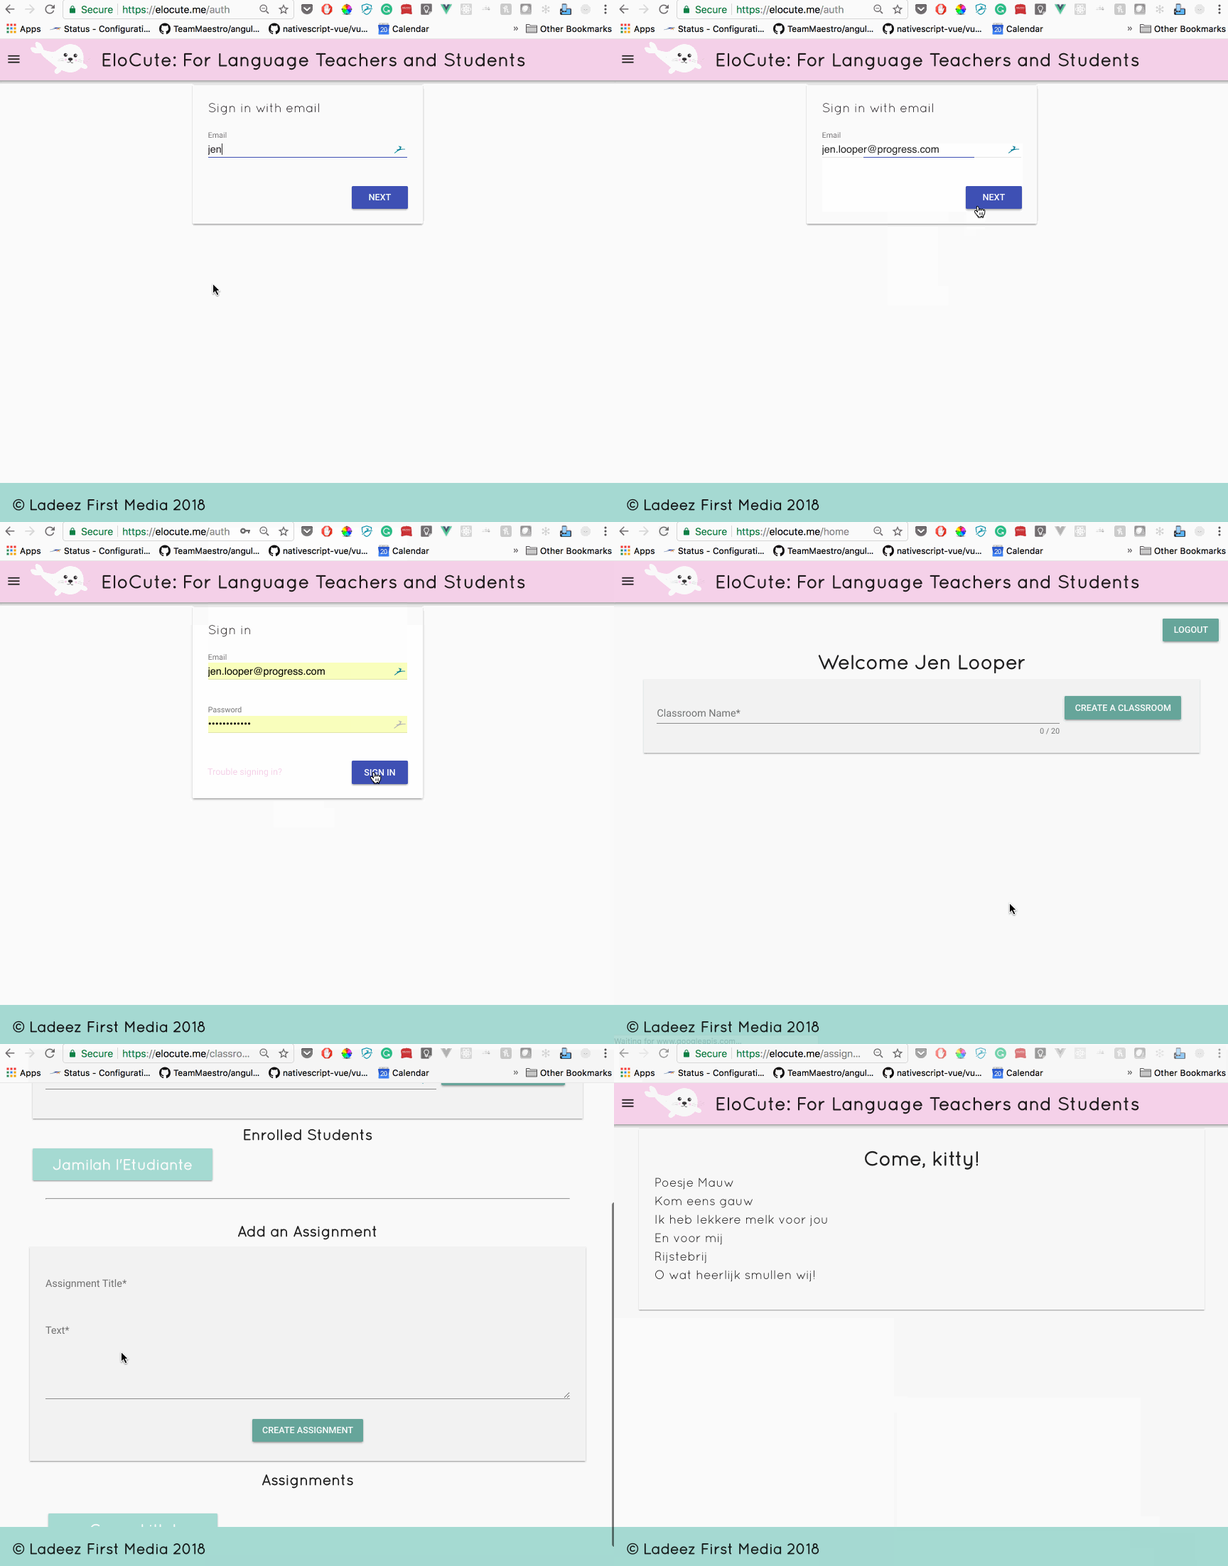
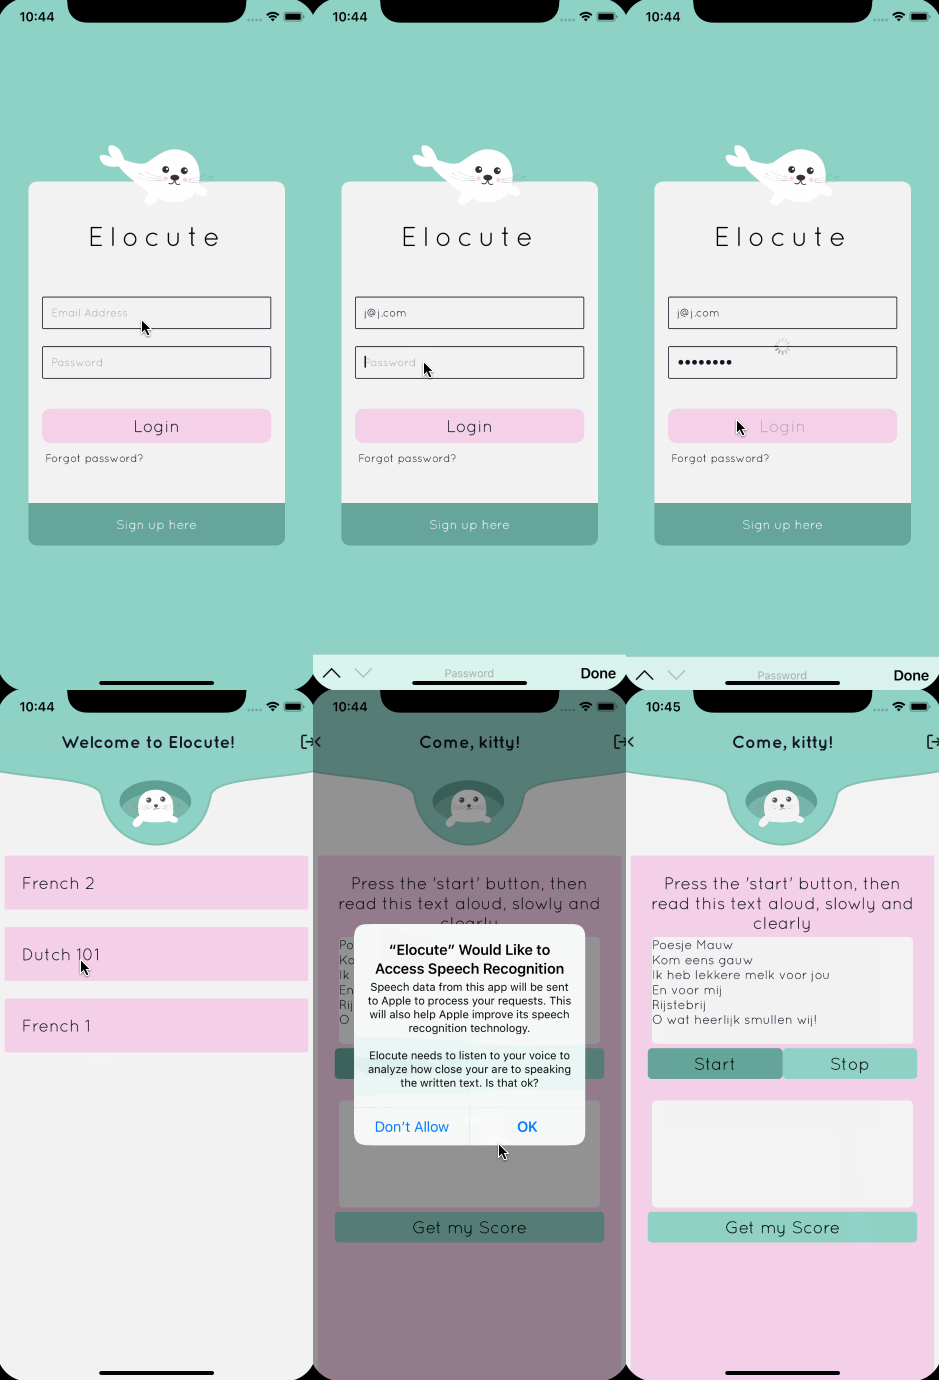
Elocute is a web app for teachers and a mobile app for students. Students create accounts on the mobile app, and teachers search for these students in the web app and add them to their classrooms. Once enrolled in a classroom, students can see the assignments that teachers create on the web app. A teacher can input a text for the student to speak into the mobile app, and the student is offered a nice interface to watch the speech recognition plugin (by plugin master Eddy Verbruggen!) transcribe the text as they read it aloud. An algorithm quickly gives the student a score based on the match between the transcribed text and the teacher's written text. Given the interface, you’ll understand why I named the app Elocute - it's a cute app for elocution! Also I like harp seals.
Building the Web App
For the initial launch of the dual apps, I decided against creating a monorepo as our current ability to share code between web and mobile apps is not as mature as, for example, our Angular code-sharing story. So I dove into learning Vue.js by building the teachers’ web app first. Several tools immediately proved their worth:
-
The Vue CLI: Scaffold a web app easily with the Vue CLI. While we await the final release of version 3.x of the CLI, you can quickly get up to speed using the current version (now at 2.9.3). There are several templates from which to choose; I wanted linting and e2e tests so I chose the standard webpack template (https://github.com/vuejs-templates/webpack) so scaffolded my app with the command
vue init webpack elocutein thewebfolder of my repo. Off to the races! -
The Firebase UI library: I knew I would need authentication and knew I wanted to use Firebase, but when I began the project, the VueFire project had not yet been updated. So I decided to simply use Firebase itself for the web along with a helper library for authentication: Firebase UI. On the web, this library solves a multitude of UI and validation problems; I highly recommend it. With just a few lines of code you can build out a respectable authentication routine.
-
Vuetify: Vuetify is another problem-solver for the web. I wanted a responsive website with a predictable UI, and Vuetify fit the bill. Built as a library for building a semantic, material-design flavored UI for Vue.js, Vuetify offers a clean way to build your site. Install Vuetify and give it a theme in
main.js:Vue.use(Vuetify, { theme: { primary: '#F5D1E9', accent: '#A5DAD2', secondary: '#66A59A', tile: '#F3F3F3', }, });Then, start building your UI. Your markup in the Vue.js single file component ends up looking like this for the card interface I wanted to build:
<v-card color="tile" tile="" class="pa-4">

About EloCute
... </v-card>
The final result was a fast-loading web app with quick authentication and a pleasant user experience:

Building the Mobile App

At the time I needed to build the mobile app, I was able to turn to a few templates currently available via the community, notably one used to build a clone of the ‘Groceries’ app, which is NativeScript’s basic demo app for authentication and basic data management strategy. It seemed like a good fit for a quick build-out of Elocute, as it uses a backend service, login and registration UI strategy, Vuex, routing, single-file components, and plugins: all things I needed for Elocute. The development experience can be a little dicey with this template, as you need to run the app via two terminals:
# terminal 1
cd groceries-ns-vue
webpack --watch --env.tns --env.android

# terminal 2
cd groceries-ns-vue/tns
tns debug android
# or
tns debug ios
One gotcha with this template is the fact that you need to change directories to tns to run the app. Got me every time!
The helpful tools that proved their worth when building the mobile app included the use of the Firebase plugin and the speech-to-text plugin, both by Eddy Verbruggen. To use Firebase, import it in main.js : import firebase from 'nativescript-plugin-firebase' and then initialize the plugin:
firebase.init({
  onAuthStateChanged: data => { // optional
    console.log((data.loggedIn ? "Logged in to firebase" : "Logged out from firebase") + " (init's onAuthStateChanged callback)");
    if (data.loggedIn) {
      backendService.token = data.user.uid;
      store.commit('setUser', data.user)
      router.replace('/home')
    }
    else {
      backendService.token = ""
      router.replace('/login')
    }
  },
  persist: false,
}).then(() =>
  (error) => console.log(`firebase.init error: ${error}`));
Then, you can force the app to redirect to the home screen if a login token exists:
mounted() {

    // force first redirect
    if (backendService.isLoggedIn()) {
      router.replace('/home')
    }
    else {
      router.replace('/login')
    }
  }
}).$start()
Vuex also proved its worth in the mobile app. It’s a great library to use when you need to manage state and data flowing through your app. Firebase and Vuex work together, for example to fetch a user’s Classrooms.
In the presentation tier, the classrooms are picked up. For example in Home.vue, import mapState and mapActions from Vuex, and then set a computed property to map the user’s classrooms:
import { mapState, mapActions } from 'vuex';
...

computed: {
        ...mapState(['classrooms'])
  },
When the route is initialized, the classrooms are fetched from the store:
methods: {
      ...mapActions(['fetchClassrooms']),
    init() {
        this.fetchClassrooms();
    },
    ...
  }
Firebase is then queried:
fetchClassrooms: ({ state, commit }) => {
      firebase.getCurrentUser().then(
        function (user) {
          var path = "/Users/"+user.uid+"/Classes";
          var onValueEvent = function (result) {
            if (result.error) {
              console.log(result.error)
            } else {
              const obj = result.value;
              const classrooms = Object.keys(obj || {}).map(key => ({
                id: key,
                ClassName: obj[key].ClassName
              }));
              commit('setClassrooms', classrooms);
            }
          };
          firebase.addValueEventListener(onValueEvent, path).then(
            function (result) {
              that._listenerWrapper = result;
              console.log("firebase.addValueEventListener added");
            },
            function (error) {
              console.log("firebase.addValueEventListener error: " + error);
            }
        );
      }
    )
    }
Then, commit the data to the Vuex store:
setClassrooms: (state, classrooms) => {
      state.classrooms = classrooms;
    },
Once you get going with Firebase (or your database of choice) and Vuex, you can really start rocking out with Vue.js and NativeScript!
Time for a rewrite!
While the Groceries model worked well to get up and running with a Webpack-friendly template, this is a codebase that offers a somewhat challenging developer experience, often requiring emulator restart when the two terminals get out of sync. It was time to give a new type of template a try, one developed after my initial demo of Elocute at Vue.Conf Amsterdam: the Vue CLI template. This amazing template was developed by Pascal Martineau (“LeWebSimple” on Slack) and was quickly adopted as an official “getting started” template for NativeScript-Vue.
In this implementation, routing is more stable, and the codebase is simplified (files are edited, for example, in the src folder and assets such as icons and splash screens are added in the template folder. Npm commands handle running your app in the emulator: npm run watch:ios or even simply npm run watch makes both iOS and Android emulators run at the same time, if they are open before you run the command. The Vue CLI template is a fast, clean way to build.
Into the future
In the future, the community surrounding this project is looking carefully at options for true code-sharing, e.g. creating a monorepo for iOS, Android and web functionality to be built at the same time, with as much code sharing as possible. It became apparent when working with Vuex on web and then again on mobile, that there are striking similarities between the two codebases. Why not work towards combining them into one?
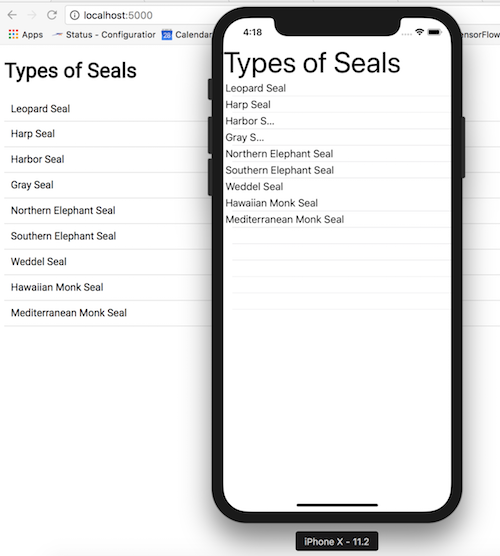
A WIP template exists that does this very thing. I created a little demo app with types of seals, rendered as an unordered list on the web and as a StackLayout of Labels on the mobile apps:

The architecture behind this template enables webpack to target either the web or native platform, switching entry points according to the targeted platform:
In entry.native.js, the nativescript-vue plugin is imported, a StackLayout is created in the template, and the app is started:
const Vue = require('nativescript-vue')
const App = require('./views/App').default
new Vue({
  template: `
    <Page>
        <StackLayout>
            <App/>
        </StackLayout>
    </Page>
  `,
  components: {
    App
  }
}).$start();
In entry.web.js, on the other hand, a typical web Vue.js app is initialized and injected into the #app div:
const Vue = require('vue')
const App = require('./views/App').default
new Vue({
  template: `
      <App/>
  `,
  components: {
    App
  }
}).$mount('#app');
Then, within App.vue and the single-file components, the templates are forked according to the platform desired:
<template web>
    <div class="App" style="font-family: 'Roboto';">
        <h1>Types of Seals</h1>
        <SealGallery/>
    </div>
</template>
<template native>
    <StackLayout>
        <Label text="Types of Seals" style="font-size: 48;"/>
        <SealGallery/>
    </StackLayout>
</template>
These fragments are picked up by the build process and either a mobile app or web app are built.
This project shows tremendous promise, but it’s definitely a work in progress! I expect to use it to rebuild Elocute once again, this time with properly shared code - and identical pieces like the Vuex store de-duped. Interested in helping push this project forward? Hop on the NativeScript Slack channel or the forum in the #vue room and let’s chat!
Source code for the various demos in this article is here.