Using npm Modules and NativeScript Plugins
Last year npm became the single biggest package manager in the software world, and as of this writing boasts over 167,000 modules. As such, npm contains a ton of pre-baked solutions for JavaScript apps, including NativeScript ones, as NativeScript follows the same CommonJS specification that Node modules do.
Between npm modules and NativeScript plugins, which are nothing more than npm modules with the ability to use native code and libraries, you have now have a large collection of modules and libraries that you can leverage in your NativeScript apps.
Let's look at how using a module you're sure to need in your next mobile app: the knock knock joke module.
Adding npm modules to your app
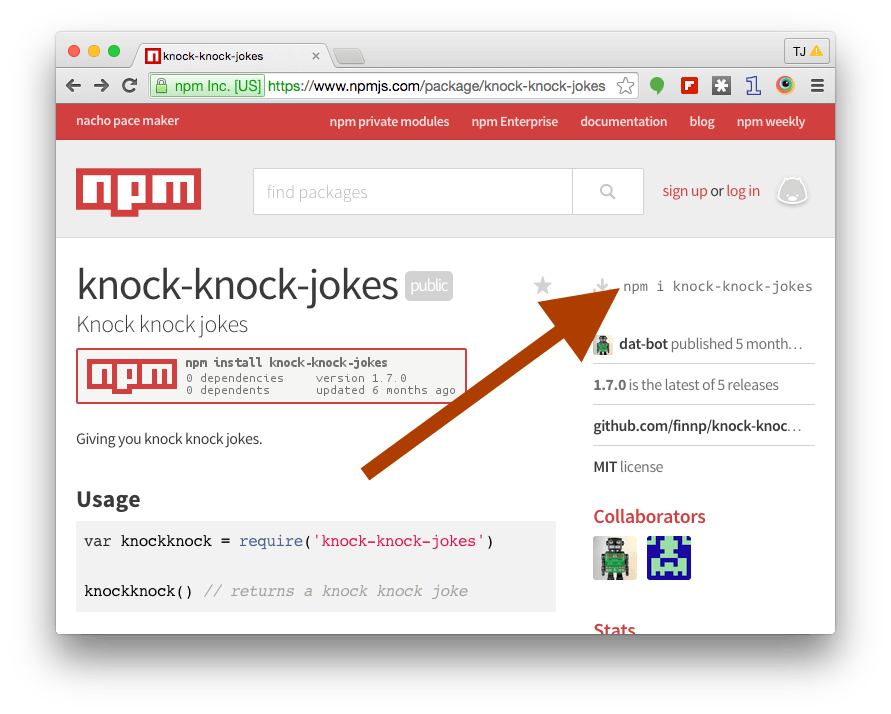
To use a module in a NativeScript app your must first install it. You can find the installation instructions on the top-right corner of the npm site. Here's where it is for the knock knock jokes repo:
Note:
npm iis a shorthand fornpm install. I actually prefer the longer version because “install” is more clear.
There are two NativeScript-specific things you need to know about the install. The first is that you need to run the install from the root of your NativeScript app, aka here:
my-project <---------------- ├── app │ └── ... ├── package.json └── platforms ├── android └── iosTip: The NativeScript CLI requires this location to load the installed npm modules into the appropriate folders at build time. So if you're getting file-not-found errors at runtime, make sure to double check that you're installing your modules in the root of your app.
The second important note is to install modules using the --save flag.
$ npm install knock-knock-jokes --save
This saves your project's dependency on the module in your app's package.json file. After you run the install you should see the module listed in the "dependencies" object of your package.json. Note the location of "knock-knock-jokes" below.
{ "nativescript": { ... }, "dependencies": { "knock-knock-jokes": "^1.7.0" }}
After the install you should also see a new node_modules folder in your app, containing the newly installed knock knock jokes module.
.├── app│ └── ...├── node_modules│ └── knock-knock-jokes├── package.json└── platforms └── ...
With this install out of the way, let's look at how to actually use the module.
Using npm modules in your app
To use an npm module all you need to do is require() it and use its documented API. The string to pass require() is usually the module name, and is also usually documented on the module's page. For example here's where it's documented on the knock knock jokes repo:
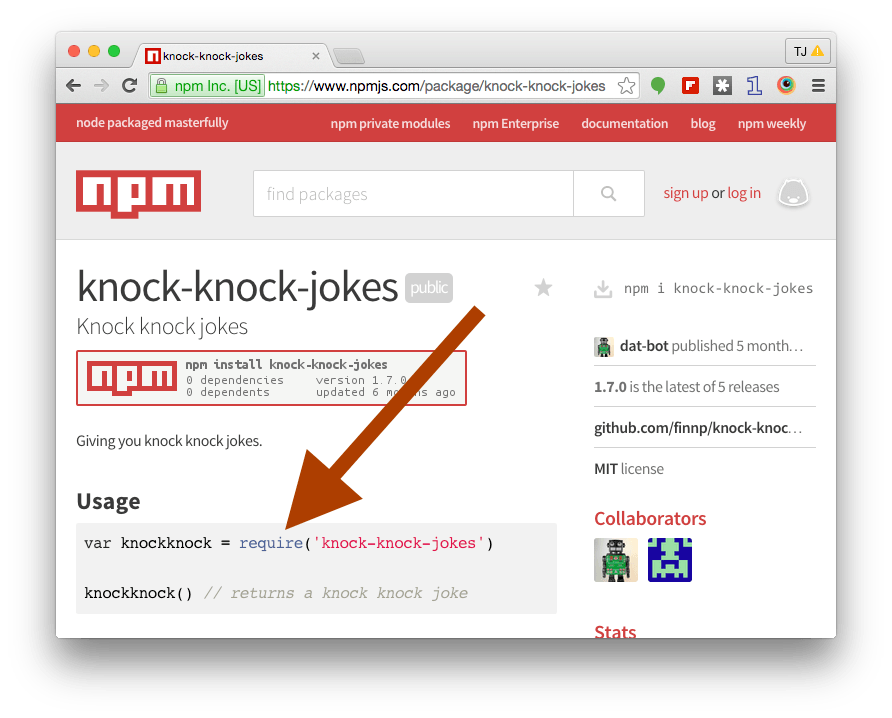
From there all you have to do is use the modules's API. The knock knock jokes API is simple, as all you need to do is call knockknock() to get a random joke.
var knockknock = require("knock-knock-jokes");console.log(knockknock());
For a slightly more robust example, here's a small NativeScript app that shows off the knock knock jokes module in action:
                                  <!-- main-page.xml -->
 <Page loaded="loaded">
     <StackLayout>
         <Button text="Joke me" tap="generateJoke" />
         <Label text="{{ joke }}" textWrap="true"
                                    />

                                          </StackLayout>
 </Page>
// main-page.jsvar knockknock = require("knock-knock-jokes");var observable = require("data/observable");var pageData = new observable.Observable();</p> exports.loaded = function(args) { args.object.bindingContext = pageData;};exports.generateJoke = function() { pageData.set("joke", knockknock());}; 
Chances are you won't need to use the knock knock joke module in your next production app, so let's move on to a module you likely will want to use: Moment.js.
Using Moment.js
If you're not familiar with Moment.js, it's a very powerful and useful date parsing and formatting module. To start using Moment.js you can find it on npm, and run its installation instructions, remembering to specify the --save flag:
$ npm install moment --saveAs with the knock knock joke module, this will download Moment.js from npm, as well as store Moment.js as a dependency in your app's package.json file. To use Moment.js in your app, all you have to do is require() it and use its documented API. For example the following code logs the current day of the week:
var moment = require("moment");console.log(moment().format("dddd"));Let's return to the knock knock app and add Moment.js in there as well, in the form of a formatted timestamp—because you wouldn't want to forget the date and time you generated these jokes on.
With Moment.js, adding this functionality to a NativeScript app is quite easy. Start by adding a new label to the page's XML to hold the timestamp:
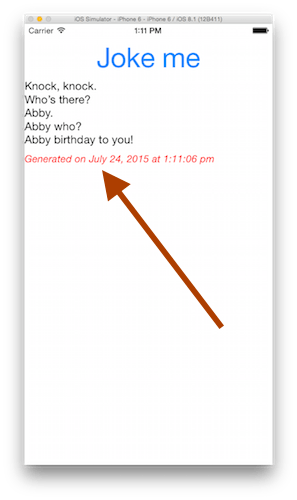
<Label text="{{ timestamp }}" cssClass="red" />Tip: The cssClass attribute is used to assign a “red” CSS class name to this label element. The app's CSS contains .red { color: red; font-style: italic; } to give it the red look it has in the screenshot above.
Then in your page's JavaScript, add a require() call to bring in Moment.js:
var moment = require("moment");And then a bit of JavaScript to set the timestamp property on the view model every time the user clicks the joke button:
exports.generateJoke = function() { pageData.set("joke", knockknock()); pageData.set("timestamp", "Generated on " + moment().format("LL") + " at " + moment().format("h:mm:ss a"));};Tip: You can refer to Moment.js's docs for more detail on how the format() method works, and the various options you can pass to it.
And that's it! Here are two copy-and-paste friendly snippets of this app's XML and JavaScript files if you'd like to try out this example for yourself:
<!-- main-page.xml --><Page loaded="loaded"> <StackLayout> <Button text="Joke me" tap="generateJoke" /> <Label text="{{ joke }}" textWrap="true" /> <Label text="{{ timestamp }}" cssClass="red" /> </StackLayout></Page>// main-page.js
var knockknock = require("knock-knock-jokes");
var moment = require("moment");
var observable = require("data/observable");
var pageData = new observable.Observable();</p>
exports.loaded = function(args) {
args.object.bindingContext = pageData;
};
exports.generateJoke = function() {
pageData.set("joke", knockknock());
pageData.set("timestamp", "Generated on " +
moment().format("LL") +
" at " +
moment().format("h:mm:ss a"));
};
With this change in place the app looks something like this:
Hopefully this gives you some idea of the power that npm brings to your NativeScript apps. And things get even more powerful when you bring NativeScript plugins into the picture.
Adding NativeScript plugins
NativeScript plugins are nothing more than npm modules that have the added ability to access native code, and even leverage existing Android and iOS SDKs. Because NativeScript plugins live on npm, most of the instructions we just looked at for npm modules still apply to NativeScript plugins. The one difference is in the installation, as you install NativeScript plugins using the tns plugin add command. For example here's how you install the NativeScript clipboard plugin:
$ tns plugin add nativescript-clipboard
tns plugin add still does the install from npm, and still saves the dependency to your package.json file. However the command does a few additional things, such as processing any iOS and Android libraries and configuration files that the plugin uses. For instance the NativeScript flashlight plugin uses an AndroidManifest.xml snippet to set the appropriate Android permissions needed for an app to use the camera.
To see how plugins work in action, let's look at how to add the NativeScript social share plugin to the knock knock app—because what good is a joke app if you can't share the jokes with your friends?
To start, you'll want to run the tns plugin add command to do the install:
$ tns plugin add nativescript-social-shareFrom there all you need to do is require() the plugin, and use its documented API. For instance the following invokes the iOS and Android native sharing widget to share the text “hello world”:
                                  var socialShare = require("nativescript-social-share");


                                  socialShare.shareText("hello world!");
To add this functionality to the knock knock joke app, let's add one of the new UI components introduced in NativeScript 1.2: the <ActionBar>. The following adds an action bar to the app that includes a single share button:
<Page.actionBar> <ActionBar title="knockknock"> <ActionBar.actionItems> <ActionItem text="Share" tap="share" ios.position="right" /> </ActionBar.actionItems> </ActionBar></Page.actionBar>
The new button calls share() on user tap, so to create that function you can add the following code to your JavaScript code. All the code does is require() the plugin, and pass the text contents of the joke to shareText().
var socialShare = require("nativescript-social-share");exports.share = function() { socialShare.shareText(pageData.get("joke"));};Here's a copy-and-paste friendly version of the app's files you can try for yourself:
<!-- main-page.xml --><Page loaded="loaded"> <Page.actionBar> <ActionBar title="knockknock"> <ActionBar.actionItems> <ActionItem text="Share" tap="share" ios.position="right" /> </ActionBar.actionItems> </ActionBar> </Page.actionBar> <StackLayout> <Button text="Joke me" tap="generateJoke" /> <Label text="{{ joke }}" textWrap="true" /> <Label text="{{ timestamp }}" cssClass="red" /> </StackLayout></Page>
// main-page.js
var knockknock = require("knock-knock-jokes");
var moment = require("moment");
var socialShare = require("nativescript-social-share");
var observable = require("data/observable");
var pageData = new observable.Observable();</p>
exports.loaded = function(args) {
args.object.bindingContext = pageData;
};
exports.share = function() {
socialShare.shareText(pageData.get("joke"));
};
exports.generateJoke = function() {
pageData.set("joke", knockknock());
pageData.set("timestamp", "Generated on " +
moment().format("LL") +
" at " +
moment().format("h:mm:ss a"));
};
And here's what the updated app looks like on iOS and Android:
Wrapping up
Overall, the ability to use npm modules greatly expands the number of things you're able to do in a NativeScript app. Need utility functionality for dealing with arrays and objects? Use lodash or underscore. Need to compose emails in your app? Try out the NativeScript email plugin.
If you're looking for a NativeScript plugin that doesn't exist you can request it on our ideas portal, or, you can take a stab at creating the plugin yourself. And stay tuned for our plugin marketplace, where we'll be listing curated NativeScript plugins you can use in your apps; we'll be launching the marketplace later this month.